


"I’m new to building automation and it’s a bit overwhelming. What’s the first thing I should do?"
More and more, folks who aren’t building automation professionals are being put in charge of building automation systems.
I’ve compiled a list of 13 actions someone with a new or existing building automation system can take to make sure their system is setup to support them. The good news is that with a few actions you can reduce the risk of your building automation system failing.
However, things do fail. If and when your building automation fails the steps in this checklist will ensure that you can quickly get your system up and running so that there is very little impact on your business.
What is BAS Optimization?
Before we get started, I just wanted to mention that, with any building, you will have nuances that are specific to your system. As you follow this document, realize that these are overall recommendations and you will have to adjust them for your individual systems. Be smart and, before you make changes to anything, make sure you understand how the changes could impact your systems.
What Will I Take From This?
When you finish this article, you will have a Building Automation System that is fully documented, sustainable, and efficient. If you follow each of these steps you will also have a robust building automation standard which is something that owners pay thousands of dollars to create.
Summary of Actions
I’ve created a list of 13 actions that when taken will improve the functionality of your building automation system and will help you to effectively manage your building automation system. This list is based on my own personal experience having designed, installed, and serviced hundreds of buildings.
#1 Create a naming standard
Naming Standards are critically important. They effect everything from your graphics, troubleshooting, and user experience. I will walk you through a series of steps to create naming standards.
#2 Detail out your user profiles
Your BAS can be a great tool for engaging your users and improving occupant satisfaction. Often however the BAS is setup for only one person. I am going to show you the most common user profiles and how to set them up.
#3 Define your graphics templates
Graphics are the primary method for interfacing with a building automation system. Done right graphics can make your system intuitive to your users. I will show you how to identify and create standards for your graphics.
#4 Create an online building automation documentation library
You don’t want to be rummaging through a closet to find your sequences and controls drawings when your system crashes. I will teach you how to create a repository using free cloud storage to provide always on, mobile friendly access to your documentation.
#5 Detail out your trend standards
As you may recall from my series on trends, trends done right can significantly improve the efficiency and effectiveness of your building automation system. I will guide you through my process for trend standardization.
#6 Structure your alarm workflow
Contrary to popular belief alarms aren’t just for failures. Alarms can notify you of issues way before a failure occurs. I will help you create a step by step process for setting up and responding to alarms.
#7 Securely implement remote access
Sending someone to a site because you haven’t set up remote access is simply stupid. I am going to guide you through setting up a VPN to access your building automation system securely
#8 Setup your scheduling zones
I’ve been to too many buildings where the lights are on but no one’s home. I am going to teach you how to segment your building into zones and how to create a proactive scheduling strategy that only runs your building when it is needed.
#9 Create a daily override report
Did you know that within 2 years of a building being occupied it can balloon up to 140% of its design energy usage. A large cause of this is forgotten overrides. I will take you through a process of how find these overrides on a daily basis.
#10 Stock and preprogram your critical controllers
Do you have a system that simply can’t be down. One of my favorite techniques for critical systems is to stock and pre-program controllers for disaster recovery. I will take you step-by-step through this process.
#11 Define your load shedding process
Depending on where your building is you may be required or may simply want to reduce your energy. I will talk you through how to create load shedding profiles and how to determine inter-dependencies between the systems you are turning off and leaving on.
#12 Plan out your business continuity and disaster recovery (BCDR)
Things fail and not surprisingly they tend to fail at the most inopportune time. Most folks haven't thought this through and don't have a process in place for when bad things happen. I will guide you through creating a business continuity and disaster recovery process.
#13 Determine your upgrade process
I’ve been on plenty of projects where the upgrades to the existing system either crippled the system or accidentally deleted key databases. This could have been avoided if there has been a clearly defined upgrade process. I will help you to create that upgrade process.
If you're still trying to figure out what a building automation system is then signup for my free BAS Fundamentals minicourse.

The Actions
Action 1: Create a naming standard.
There's a reason this action is number one. Without proper naming standards everything else on this list is immensely more difficult. I'm gonna walk you through how to create naming standards in the steps below.
Step 1: Identify your systems
First you need to write out the systems you have. For example, if I was a facility manager for a school with two air cooled chillers, 4 rooftop units, 10 fan coils, and 2 exhaust fans then I would write out the following:
- School
- Zones
- Air-Cooled Chillers
- Roof-Top Units
- Fan Coils
- Exhaust Fans
Step 2: Create your naming standards
Next you need to detail out the points and what they do, if this is a new, yet to be built system then you are in luck. Depending on the stage you are at in the construction process you can simply direct your consulting engineer to call the systems whatever you want or you can work with the controls contractor to ensure they name the systems accordingly.
Now you are going to list out the points for each system, for this example we will focus on the School, Zones, Air-Cooled Chillers, and Fan-Coils.
School:
- Occupancy Schedule - The over all master schedule, should not be set in case a zone schedule fails
- Name- A clear name that identifies the school
- Identifier- A code or sequence of letters to identify the building
Zones:
- Occupancy Schedule- The zone schedule, this should be the primary schedule
- Name- A clear name or sequence of letters that identifies the zone (eg, CR- Classroom, GYM- Gym, LR- Lunch Room)
- Identifier- A full text identifier of the zone. This will often be put in the description field for the control device(s) that serve the zone.
Air-Cooled Chiller:
- Occupancy Schedule- The Chilled water system schedule, this should be used only if the central plant is not using a winter/summer change over set-point.
- Name- A clear name or sequence of letters that identifies the equipment name and space(eg, CH-1 Mech Rm 101)
- Identifier- A full text identifier of the chiller. This will often be put in the description field for the control device(s) that connect to the chiller (e.g CH 1 York CYK 500 Ton VSD Mech Room 101 Pwr Panel 5B)
Points:
Chiller Point Standards |
|
Point Name |
Control System Name |
|
Chiller Enable |
CH-EN |
|
Chiller Start/Stop |
CH-SS |
|
Chilled Water Supply Temperature |
CHWS-T |
|
Chilled Water Return Temperature |
CHWR-T |
|
Chiller Status |
CH-S |
|
Chilled Water Supply Temperature Setpoint |
CHWST-SP |
|
Chilled Water Isolation Valve |
CHWSISOV-O |
|
Chiller Load Percentage |
CHLD-PCT |
Step 3: Document your standards and apply them to your systems
Now you need to take the standards you created and put them into a formal document that you will reference on all of your projects going forward. On your existing systems you will want to work to gradually add the naming standard into your building automation system. Each system is different and I would encourage you to try out the above steps and let us know your results in the comments.
Action 2: Detail out your user profiles
How many users do you have for your building automation system? Do you even know? How could you find out? Knowing who your users are is critical to creating your standards.
In this step you will learn how to setup your users, user access permissions, and user groups.
Step 1: Identify your users
In order to build standards that work for you, you need to know who you is. So who uses your building automation system? This is often quite difficult as quite a few customers use a single login for everyone rather then individual logins.
Then how do you identify users? I recommend emailing your current users and following this email up with a face-to-face or phone call.
I will often ask, the following:
- How do you currently use the building automation system?
- What do you use it for?
- Bonus question- How could it be better?
Now you take the responses and put them into an excel sheet.
Step 2: Segment your users by function into groups
You have an excel sheet full of users now you need to segment them. If you go crazy with groups you can quickly create an unmanageable user list. Therefore I recommend the following user groups
Administrator- The administrator has full access to everything this is typically 1-3 people in the organization. These are the only people who can add new users.
Technician- These are the people who will program your system and will work through any issues with the system.
User- Users have access to change schedules and set-points related to their specific systems. This might be a boiler plant operator or a specific building operator.
Viewer- Viewers will have view-only access to a subset of specific devices and points.
Limited User- Limited Users have access to change specific set-points. This is an optional user type that I will typically use for buildings with multiple tenants
Step 3: Creating categories for your systems
This capability doesn't exist in every building automation system but some systems support the capability to categorize points and systems. Using this concept you can set the category for each system and record that category in your standards.
Once you've set the categories you can now apply access to the categories for each user.
Step 4: Setup the user groups in your building automation system
This step is simply an expansion of step 3. Now that you have a list of the user groups and you have categories setup you can setup the systems that each group can access.
In Action 1 you created your point standards. We are going to continue to build out your building automation standards now by establishing what systems the different user groups can access.
Most of the building automation systems already have preset groups and if they provide the capabilities needed by your groups then use those. Otherwise you can create a new user group.
If your building automation system does not support groups (which is the case with some older systems) then you can simply set permissions for the systems or graphics. Since this is specific to the BAS I am not going to dive deep into this.
As with every step in this guide as you gather the information and setup your groups be sure to add it to your building automation standard document from Action 1
Action 3: Define your graphic standards
Ah, graphics, do you know what one of the biggest factors to building automation selection is? It's how the graphics look. Yet, despite this, so many customers and installers neglect to establish any graphic standards.
Why is that?
Well for one it seems really hard, after all I can barely draw a straight line so for me to do graphics, that's a stretch! However, it doesn't have to be that hard! After you get done with this section you will be well on your way to creating a graphics standard for your building automation system.
Step 1: Inventory your current systems
The step is fairly self-explanatory, you have three ways of inventorying your equipment:
- Manually inventory your equipment using your building automation system or your project drawings
- Automatically report on your equipment by running a report on your building automation system
- Walk your buildings and get an equipment count, this is a last resort option if you can't do option one or two
Step 2: Segment the users of your building automation system
Now for the fun part! You need to go and list out the users of your building automation system. This is an exercise where you really need to be thorough. I've seen equipment destroyed because the janitor had the same access as the controls technician and accidentally turned off the cooling to the IT closet.
You will segment your users by a process of interviewing your team to understand who uses the system and by checking the system user logs.
Questions you will ask are how do you use the system?
What do you use the system for?
How would you like to use the system but you can't due to the interface?
Step 3: Draft the user flow for each user type
Based on the answers to these questions you will build out a user flow for each user group. This will detail out their use cases and how they flow through the system.
This may seem like a lot of work but if you are able to reduce a users time on the system by 10 minutes per day at the end of a year you will have reduced 2500 minutes or roughly 100 hours of lost time.
The common user scenarios are:
- Adjust a set-point
- Change a schedule
- Check on Alarms
- View a Trend
- View a system graphic
Fortunately, you only need to build out templates for these 5 scenarios. For the rest of this section, I will use the scenario for adjusting a set-point.
Step 4: Determine how the user will access the system
If a user needs to change a set-point the first thing they will need to do is to access the system. This means you must determine if you need to support mobile, tablet, or laptop devices.
Once you have determined if you can support these device types you will need to determine how the user will flow through the system. I have detailed out a sample flow chart for accessing a system via a mobile device below.
Step 5: Identify key graphics templates for your users
Now that you have the flow detailed out you must work to create or have someone else create the graphics templates for this user group. Sometimes these templates will be used in multiple scenarios or by multiple users.
Following the same example, I have mocked up the user templates below. Remember at this point you don't need pretty. Some simple boxes will do, the point is to detail out the flow and how you want the graphic to look. The building automation provider will deal with the actual graphics themselves.
Step 6: Document the templates and users for your standards
Now that you have the templates and user groups identified you will need to document the templates and user groups into your building automation standards.
Action 4: Create an online building automation documentation library
I can't tell you how many times I've had to rustle through spider infest closets, by the way I hate spiders, to find project drawings and or documentation for a building automation system. It doesn't have to be like this though. Because of the "cloud" you can now store all of your documentation online and access the documentation on demand.
By the end of this section you will know how to move your documentation online and create an online library of all of your building automation drawings, specifications, and standards.
Step 1: Collect your building automation documentation
This is the hardest part, however, it can be done! I've worked with hundreds of companies who have followed this approach. Here is what works. First, don't let perfect be the enemy of good. Right now you have 0 of your documents online. If you get 25% then you are 25% better then you were!
I recommend starting with your big systems if you've been following these steps in order then you already have naming and graphics standards for your building automation system. Now you are going to take these standards as well as any documents for your core systems and collect them.
Step 2: Segment the documentation
This is the most important step. How you set up your categories will dictate whether your documents are easy to use or whether this is a cluster of a document repository. Here is how I recommend structuring your folder structure.

As you can see you segment by Building -> System -> Documents.
You also have a general folder under the Building Automation Documents for your company-wide graphics, point, and trend standards.
Step 3: Upload the documentation to your storage account
Now for the "final" step. You will take all the documents you've gathered and take them to an imaging shop. Put a sticky note on each document with the name of the file and the folder directory you want.
Have the shop scan all your documents and save them as the file name and in the folder found on the sticky note. Now you simply drag that entire file structure to your cloud storage account.
Step 4: Connect your documentation to your graphics (optional but recommended)
Now that you have your files setup I recommend that you link certain key documents to your graphics. For example, I recommend that on mechanical system graphics you include a link to the control system drawing and a link to the sequence of operations. This will allow your mechanic or technician to avoid spending time searching for documentation for the particular device.
Action 5: Detail out your trend standards
I wrote a great series on trends and the various things you can do with trends and your existing mechanical systems. In order to get to that point you need to have your trends setup. I am going to show you how to identify what trends you should have and how to setup a trend standard that you can provide to your installers for every project you do.
Step 1: Identify your building automation points and existing trends
First you need to identify your existing building automation points and any existing trends. Depending on what control system you have this could be relatively easy or quite painful. The good news is that you only have to do this once.
Once you have a full export of your points list and trends you want to get this information into excel.
Step 2: Segment your devices and create a points list
You should have this information from action 1 but if you do not you will want to create a list of your different types of equipment and you will want to store that information on an excel sheet. Each equipment type will be a tab and then under each tab, you will have the points and the point description for each point.
Step 2: Define each points trend sample threshold and sampling type
Now that you have a list of your of your systems and the data points it is time to setup your trend samples and sampling type for your systems. In the past I used to recommend trending at time intervals but because data storage is so cheap now I recommend using Change of Value for all trends. This means that when the value of the trend changes by a specific threshold your system will log the trend.
My recommended trend values are in the table below, this is not an all-encompassing list but it should get you started:
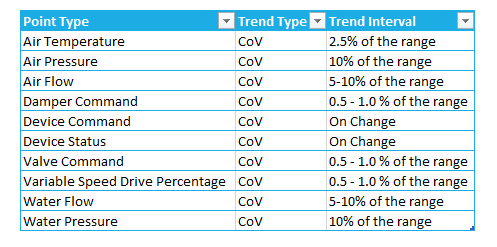
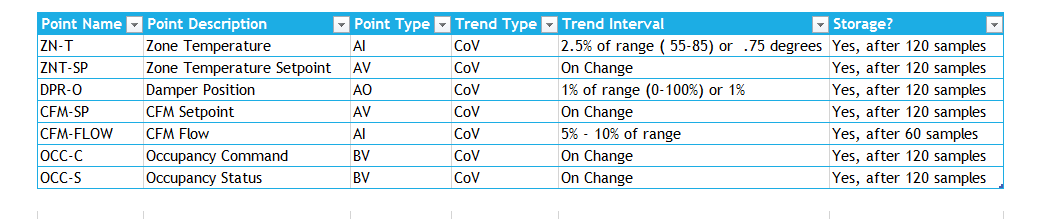
Step 3: Document your trend standards
Once you have all of your trends selected and you have decided on your trend intervals you will create a standard list of trends containing:
- Point name
- Point description
- Point type
- Trend type
- Trend interval
- Whether or not the trend should be stored
Step 4: Add new trends and modify existing trends on your building automation system
Now you have a list of standardized trends for each system. You can now begin the process of adding these to your systems. Let me caution you though. Because most controls projects are sold on a shoestring budget the supervisory devices (whether this be a JACE, NAE, PXC, ect) are often overloaded. This means that there are more points than the memory allows.
You will want to verify the memory capacity of your supervisory devices prior to adding any trends. This is why you should have standards in the first place and should require a 10%-20% excess capacity for your supervisory devices.
Action 6: Structure your alarm workflow
I've been to Fortune 100 companies that have over 50,000 unacknowledged alarms on their building automation systems. I mean 50 friggin thousand! How can you manage your building when you have that many false positives. The problem I find is that people don't know how to properly setup up alarms and just go crazy on setting alarms on everything.
In this action, you will learn how to prioritize critical systems and how to create a standard process for alarming in your building.
Step 1: Determine what alarms are critical
If you don't determine your critical systems than everything becomes an emergency. Only real alarms should show up and only critical alarms should get escalated. So how do you determine what systems are critical? This is a very subjective topic, here are the three questions I use to determine critical systems.
- Will the loss of this system pose a risk to human life or equipment damage?
- Will the loss of this system impact your current business processes?
- Will the loss of this system cause future unknown impacts?
If you go through the equipment list you created earlier you can quickly put your systems into three buckets:
- Critical
- Urgent
- Warning
Step 2: Define your escalation levels
Now that you have your categories and critical systems mapped out you can determine how you will respond to each level. In the image below I have built out an escalation map for how to route alarms related to a critical chiller plant failure.
Step 3: Map out your response
Taking step 2 a bit further you can now begin to draft standard response procedures. While this will be covered in a greater detail in your Business Continuity plan in Action 12, you should still plan out how and who will respond.
Honestly, this may seem like a lot of work but the first time you respond to a chiller failure in your data center and begin to lose critical servers you will be SO thankful that you have a response mapped out.
Step 4: Create your alarm settings
This is where a lot of folks go wrong. There tend to be 3 big mistakes when alarms are set up.
- Setting all alarms to the same importance
- Routing all alarms to the same person and not doing anything if they aren't acknowledged
- Triggering alarms out of content
Fortunately in steps 1 through 3 we've handled these issues and put actions in place to address them.
We've defined importance in step 1 now you will create the settings for your three levels of "importance".
Here is what I recommend as typical thresholds for point types on alarms.
Step 5: Put your alarms into your BAS standard and responses into your Operating Procedures
Now you will take the alarms you identified and the thresholds you established and enter them into your building automation standards. You will also take the responses you created and put them in your standard operating procedures document.
Action 7: Securely implement remote access
Did you know that each time you have an after-hours service call that you spend anywhere from $400 to $1,200 dollars?
Did you also know, based on my own personal experience services some of the largest businesses that a majority of the service calls are due to overrides and setpoints that could be fixed remotely?
What if I told you that for around $20-30 a month you could avoid or at least reduce these expensive service calls?
In this action I will teach you how to set up remote access for your building automation system.
Step 1: Decide on a software provider
There are so many providers out there. In most cases I would recommend that you talk to your IT department and tell them what you want to achieve. However, I realize some of you may not have an IT department or may not be able to work with IT for one reason or another.
Because of this I have listed out the Top 3, software based remote access solutions that you can buy and setup yourself. Those solutions are:
I've personally used all three and I prefer TeamViewer. TeamViewer has the highest priced licenses but it's the software I've been able to use on most customer sites. I'm not going to go into the pros and cons of each software but you can email me if you want further details.
Step 2: Setup the software
The setup is pretty simple for each of the software solutions you will download an executable file and you will run that file on your building automation server as well as any laptops you will be using to access the building automation system from.
Step 3: Setup users in the software
Once you have the software installed you often have to create an account and then you will use that account to log onto the building automation server.
Action 8: Setup your scheduling zones
Have you ever walked around a major city at 9 PM only to see the lights on in a majority of the buildings?
Have you ever entered a part of a school that is not being used only to find the entire space set to 72 degrees?
Often times in new construction jobs the entire school is given one schedule and left alone for years!
In this action, I am going to teach you how to divide your spaces into functional zones and how to determine adequate scheduling for those zones.
Step 1: Divide your spaces into functional zones
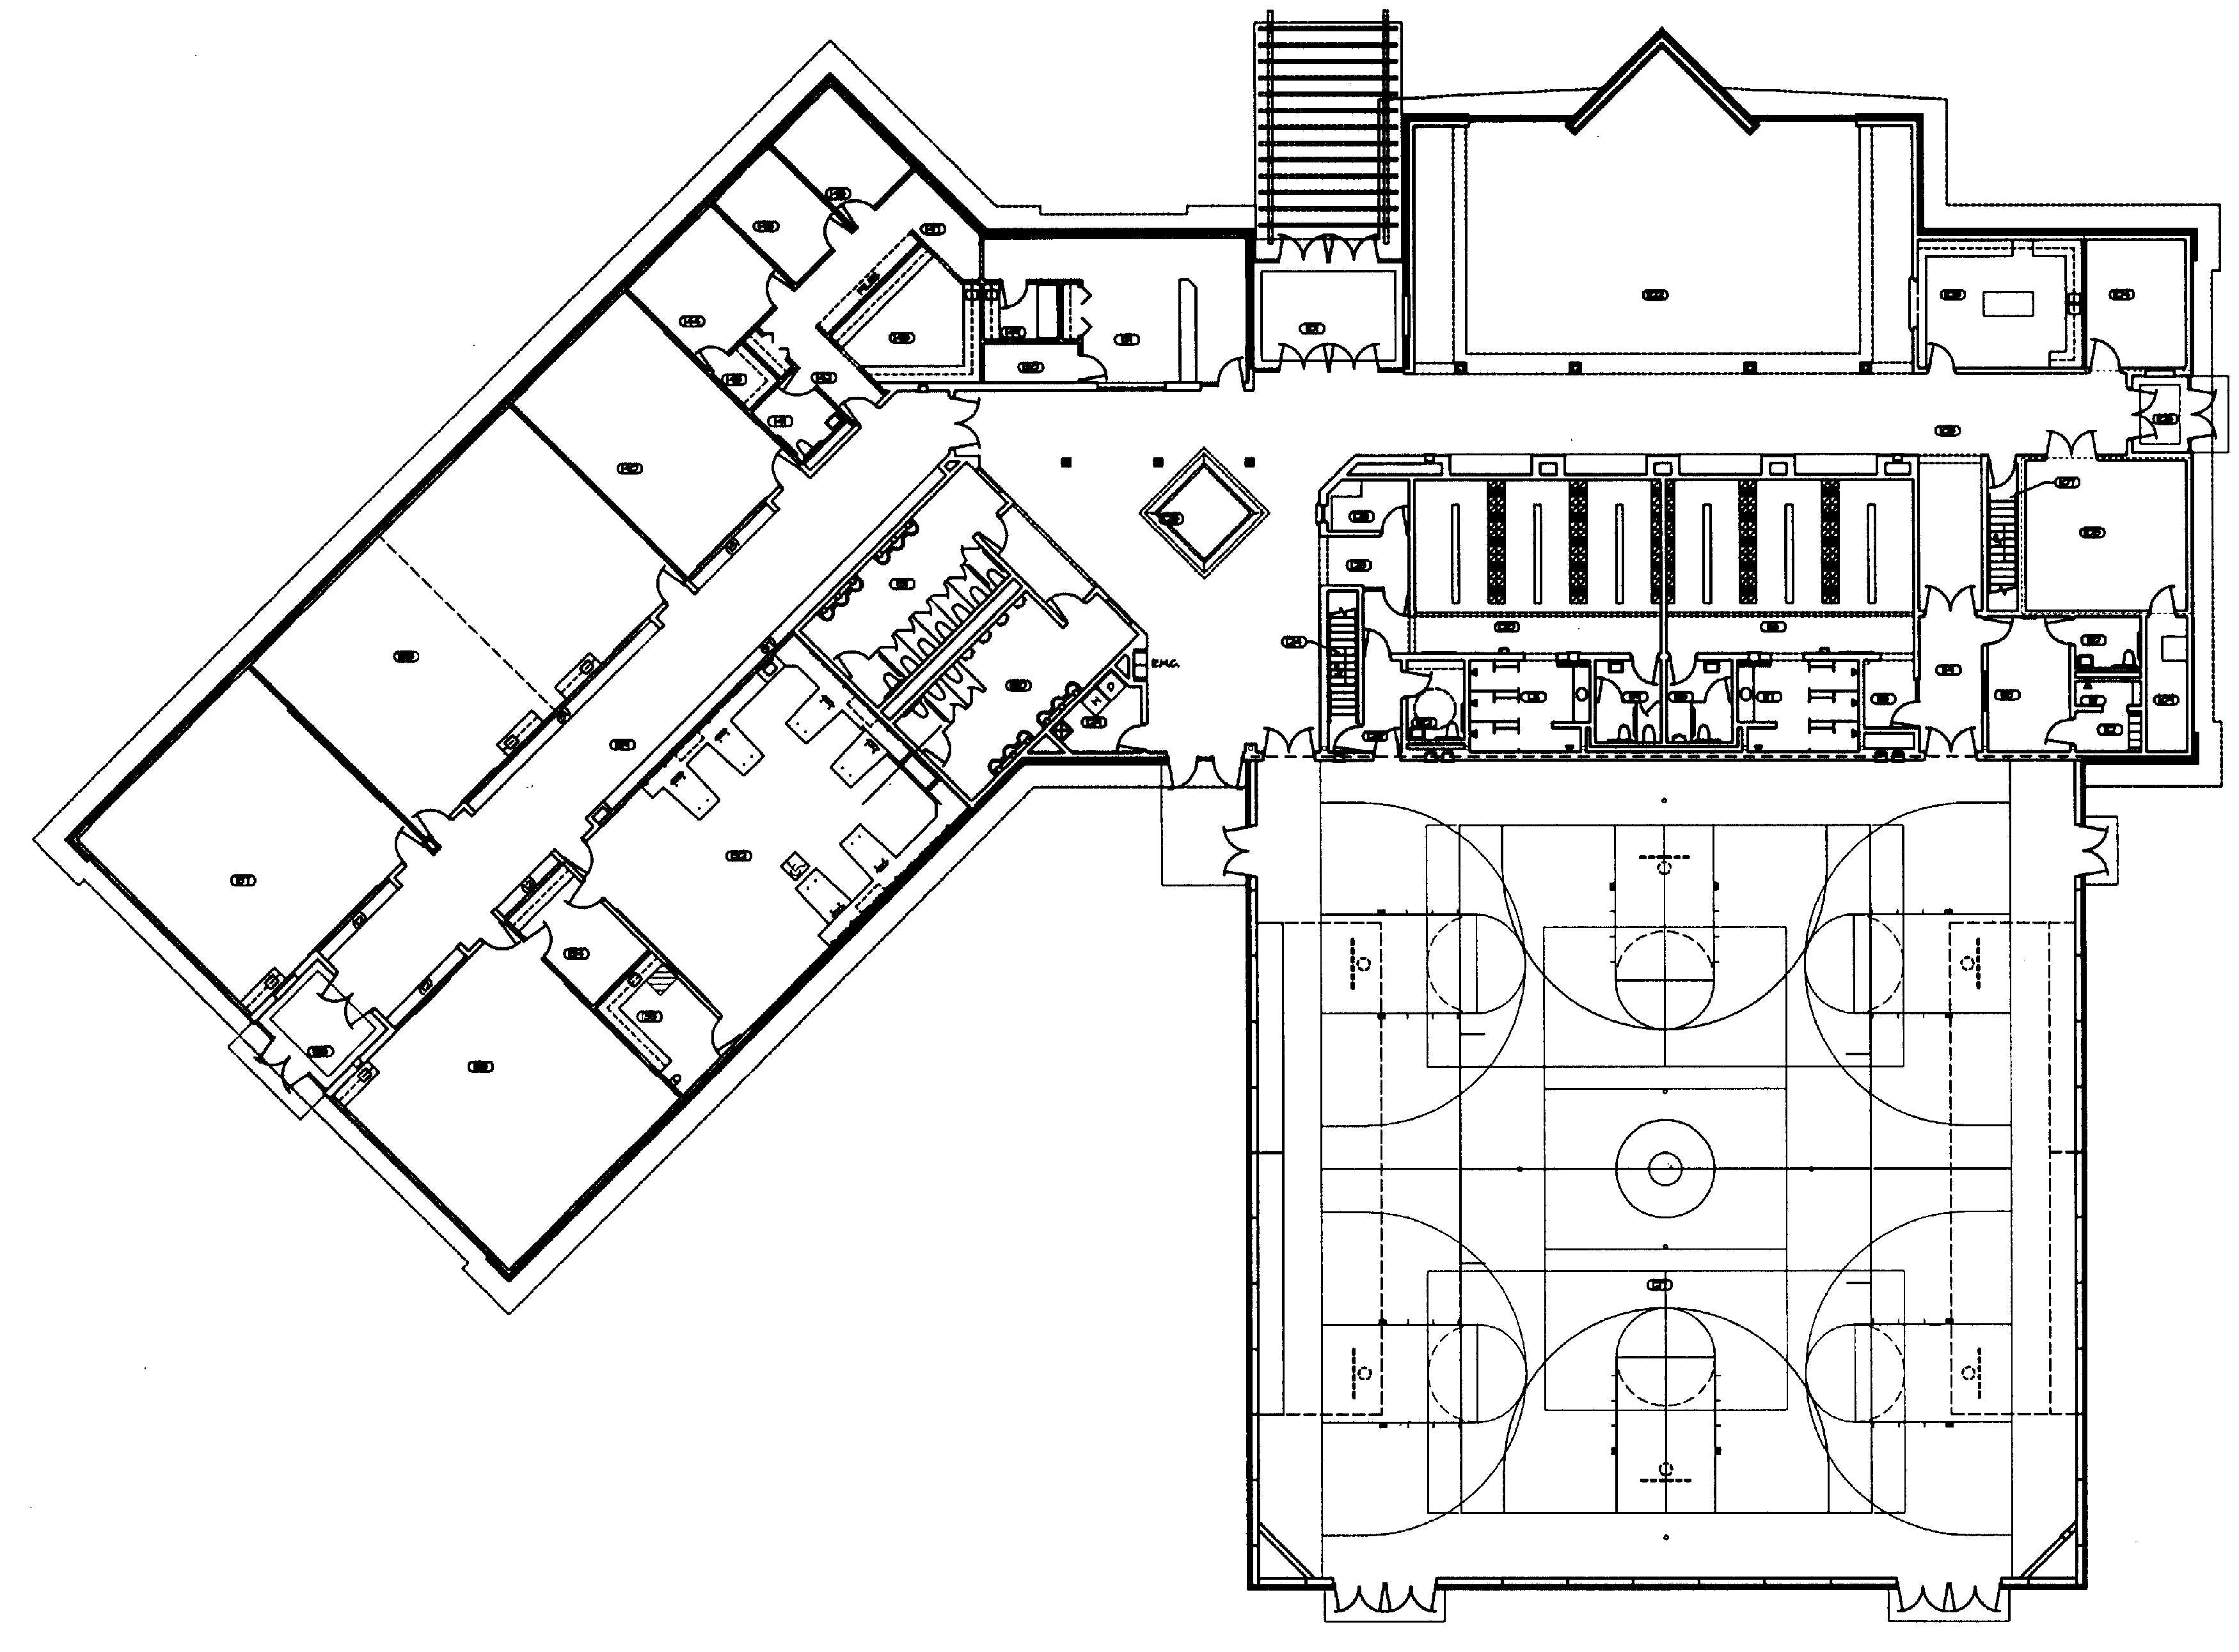
As you can see above, I have the overhead floor plan of a school (for simplicity sake I used a simple blank floor plan but in the real world you would include a mechanical floor plan to see what systems sit in what zones)
Now you will go and highlight each individual zone in a different color. I usually determine this by talking to my occupants and finding out when and how they use the spaces. If I determine a space is only used for a couple of hours, like a lunchroom, then I will go and set up a zone for that area.
Step 2: Determine your schedules for zones
Now I work with the occupants of the different zones to determine their schedules. A good way I've found that is to not ask, what time do you get in, do you really want to occupy the building for the one teacher who shows up at 3 am or leaves at 8 pm? Find out who the key people or customers are and find out what time they get in.
For example, what time do the majority of the teachers arrive and depart? Then buffer that time by 1 hour and you should have a working schedule for that zone.
Here is a key point, often unplanned events will happen, this is why your building automation system has an override button built into the thermostats typically. You should avoid adding new schedules because of how easily they are forgotten. When at all possible use timed overrides from the thermostat or the building automation system.
Step 3: Document your schedules for each zone in your standards documents
Now that you've interviewed each occupant you should have your zones schedules listed out. Transfer those schedules into a your building automation standards. I recommend that if you own multiple buildings you should create a category called standard schedules. Take your buildings and make them sub-categories and breakout the schedules for each building.
Step 4: Implement the schedules for each zone.
All of this documentation is useless if you don't go an implement the schedules in your building automation system. In this final step go and apply the schedules to your building automation systems. Be sure to notify your occupants of the change and the process for requesting schedule extensions. By the way, this is a great time to settle on a standard schedule and to start charging for after-hours usage.
Action 9: Create a daily override report
Step 1: Create an automatic override report
Most building automation systems support the creation of an automatic override report. Yet, I've only seen a handful of people who actually are using this feature. If you aren't creating an automatic override report then I highly recommend you do. In most cases, there is a simple configuration where you can schedule the report to be emailed or printed out every morning.
Step 2: If a report isn't provided by your building automation then create a query
If your building automation system doesn't have an automatic override report it may have the option to create saved queries. A query is essentially a search bar for your building automation system. In a query, you will have the option to specify a set of parameters one of which being overridden points.
You can then save this query and run it on a daily or weekly basis. The important point is to run the query consistently. While most systems support queries some won't which brings us to...
Step 3: If a query isn't available then create a graphical view
This is the least recommended option because it's a lot of work. However, when done right it can provide an at a glance view of your key systems. To create a graphical override view you:
- List out your most commonly overridden points
- Next, you list these points out into system categories
- Finally, you create a graphic with the commonly overridden points listed out as read-only points.
You can now glance at this graphic whenever you want a summary of your overridden points.
Action 10: Stock and preprogram your critical controllers
Step 1: Identify the controllers for your critical systems
In action 6 you detailed out your critical systems and in Action 4 you collected all of your key information about your current building automation system. If you haven't been through these actions you will need to complete them prior to moving on.
This step is quite simple you will look at your document database and will list out the controller hardware for each of your critical controllers. That's it step 1, done!
Step 2: Program these controllers and set their addresses
Now I recommend you upload the programs from your current controllers and you store them in a time-stamped folder in your database. Here are the steps to set up your new controllers:
- Set any external dip switches or address switches
- Power up the new controllers
- Download the program into the controller
- Verify the software settings for the new controller
Step 3: Verify the new controller has the same point identifiers and software/hardware versions
I'm going to dive a bit deeper into the last bullet from Step 2 as it seems a bit confusing for some folks.
When I say to verify the settings for the new controller here is what I am talking about. Controllers typically have a couple of settings that if you get them wrong will keep the controller from working. (I will assume your controllers are BACnet controllers as BACnet is the most common protocol).
Here are the settings:
Device ID- The device ID is the software identifier for the device, you want this to match the ID for the old controller.
Communication speed- This is the speed at which the device communicates, this should be set the same as the old controller.
Device Address- This is the address for the device, this should match the old controller's address.
I hope you are noticing a theme here in that the new controller's settings should match the existing controller's settings.
Step 4: Detail out a method for replacing the old controllers with the new controllers
You don't want your folks scrambling to figure things out when stuff is broke. If you've followed step 1-3 then your in the high performer category as to building automation readiness but there is one small step you can take that will get you into the elite category and help you make the repair time of your critical systems very small.
This step is to either document via a text document and pictures or better a video. Simply record the steps to remove an existing controller and how to connect the new controller. What you want to capture is:
- How to put the systems controlled by the old controller in manual (hand)
- How to remove power from the controller
- How to remove and tag the input and output wires from your controller
- How to remove the controller
- How to reconnect the wiring and power
- How to install the new controller
- How to gradually turn the systems back into automatic and verify that the devices are working
Action 11: Define your load shedding process
Load-shedding has become less of an "in your face" topic with the relative low utility prices we are experiencing here in the United States but there are plenty of areas that still have high utility prices around the world. Load-shedding seems to scare people and I think that is mainly due to misunderstanding.
In this action, I teach you how to set up a reliable load-shedding profile and how to make smart load shedding decisions.
Step 1: Calculate your Total Building Load
First things first you can't shed what you don't measure. Therefore the first step should be understanding your total building load. If you have your buildings utilities on a single bill you're in luck. You can simply look at your schedules and your utility bills and figure out a semi-accurate load profile.
If you have multiple bills or your bills roll up into a central utility account it may be a little more difficult.
I would suggest working with your utility provider or energy manager to gather a detailed building load. Ideally, you will want to know what utility measurement you are trying to impact so you can avoid gathering excess data. For example, if you have no desire to impact gas usage than gathering your gas usage data is a waste of time.
Step 2: Identify your critical equipment
In Action 6 you detailed your critical equipment and should have that information. If you haven't done that step then you need to go and determine:
- Will the loss of this system pose a risk to human life or equipment damage?
- Will the loss of this system impact your current business processes?
- Will the loss of this system make tenants and occupants uncomfortable?
This will allow you to determine the systems that are critical for you to maintain.
Step 3: Calculate your critical building systems load
Now that you have identified a system you need to determine its usage profile. Often times this can be gathered by looking at the following points
Electrical Consumption of the device- You can gather this from an electrical meter or an in-line logging sensor. Typically you want a week's worth of data during a non-vacation or reduced staff week.
Delta across the cooling or heating coils and GPM - This is a bit more complicated but not impossible. You need to log the entering and leaving water temperature on your cooling and heating valves (this difference is called the delta). Next, you will go and gather the GPM off your design documents or by doing a flow measurement. You will take this data and use it to calculate the load of the cooling and/or heating
Add these two loads together and you now have a load-profile for your individual systems.
Step 4: Create your load shedding levels
Now that you have the load-profile for your individual systems you can work to determine how much "load" you need to maintain in a shedding event. Once you have determined this number, by adding up the load of your critical systems, you can then document that as your minimum load-profile.
From there you can work to create other profiles that will leave additional systems running.
Step 5: Create the load shedding process
With your critical systems documented you can now document your load-shedding process. I recommend creating a step-by-step document with screenshots and or pictures that can be printed out. This will allow you to walk through each individual step in case you do not have power and have to manually shed load.
Step 5: Automate your load shedding (optional)
The final step is to create the load-shed profiles inside your building automation system and then to manually trigger the processes using a button that is linked to a sequence inside your building automation system or to link the process to an external data trigger from your utility provider.
Action 12: Plan out your business continuity and disaster recovery (BCDR)
Things fail and so far we have put in process standards that will help your building automation system detect failures and processes for you to address individual device failures. What we have not put in process is planning for systemic failure.
In this Action, we will discuss a series of steps to deal with system failures.
Step 1: List and categorize likely threats to the building automation system
In Action 6 you listed out your most critical systems, now you need to take a moment to detail out what could potentially cause them to fail. This can become an extensive list so I recommend focusing on the events that are probable. For example, a Tornado is less likely in San Diego then Oklahoma City and you should plan accordingly.
Here is my list of threats that you should plan for:
- Weather Events (Floods, Tornadoes, ect)
- Geological Events (Earth Quakes)
- Utility Events (Gas, Electrical outages)
- Technology Events (IT infrastructure failure)
- Conflict Events (Internal/External Sabotage)
Step 2: Inventory your building automation system devices
In Action 4 you created a list of all of your systems and devices, if you did Action 4 then you're done with this step. If not go back and complete Action 4.
Step 3: Set service-level expectations and define contingency policies
What kind of uptime do you expect? If your data center is supporting servers that are critical to your business then you need to ensure that the systems supporting the cooling of your servers has the same uptime expectations as your servers.
Defining your up-time or "service-levels" will be determined by the criticality of the systems. Once the up-time is defined you need to look at your contingencies. Here you will list out each potential scenario and what actions need to be taken to meet your up-time requirement.
Step 4: Develop a BCDR plan
Now that you have your contingency plans listed out you will consolidate the plans into a single document. This document should at a minimum contain:
- The BCDR Team and Contact info
- A list of the Critical Systems
- All of the contingency plans for these critical systems
- A test plan and schedule for each of the contingency plans
This document should be stored in a protected folder in the document repository you set up in Action 4. In addition to this, you will want to provide a printed, laminated copy to each member of the BCDR team.
Step 5: Test your BCDR plan
At least once a year your team should spend a day running through your top contingency plans. This can be addressed multiple ways. On the one end of the spectrum, you can do a full test that consists of actually causing the failure and then having the team execute the contingency plan.
On the other end of the spectrum, you can run through a conversational version of your contingency plan where your team talks through the failure and the steps that should be taken.
I recommend a middle ground strategy where you and the team walk through the contingency plan physically simulating each step. For example, if you need to switch to emergency power in a power loss you would physically walk to the emergency power breaker and have the team members tell you how they would switch power over.
Action 13: Determine your upgrade process
Upgrading, rip and replace, retrofit. Most folks see those words and dollar signs pop in their heads. I get it upgrading is expensive. Often times the case for upgrades is poorly built and the ROI is not determined. In addition to this, many people approach upgrades as all or nothing events.
In this action, I will give you a step-by-step process for evaluating your systems and determining a path for any required upgrades.
Step 1: Identify existing systems
In the previous actions, you should have created a list of your existing systems and a repository of all of your documentation. Now you need to go through this list and repository and select the systems that will be impacted by the upgrade. The documents you will look for are:
- Current building automation software and hardware version
- Specifications for your current building automation software and hardware
- As-Built wiring diagram and sequence of operations
- Current building automation controller programming/code
Step 2: Determine the requirements for the new systems
Now that you have the existing systems covered you will need to get the requirements for the new systems. This may be a bit difficult with the traditional bidding process as you typically get responses in the form of final proposals. That is why I recommend upgrades follow a request for qualification (RFQ) process in which companies qualify themselves and their products for your upgrades.
Obviously, this is dependent on the size of your project and its complexity. You don't want to release an RFQ for a 3 light fixture upgrade.
As part of the RFQ, you will want to ask for the new system design, materials for the design, and the specifications for the new materials. The respondents will need to know what the existing system is and this is where the documentation from step 1 will come in handy.
Step 3: Perform a gap analysis on the existing versus new system
Once you have received responses for the RFQ you can perform a gap analysis. This is much simpler then it sounds. In a gap analysis you need to identify:
- Hardware Gaps
- Software Gaps
- Infrastructure Gaps
- Technology Gaps
Hardware Gaps are things like a pneumatic inlet vane controlling a fan when the new controls call for 0-10 volt direct current variable speed drives. This could be overcome multiple ways but it is indeed a hardware gap that needs to be accounted for.
Software Gaps are related to the software itself. If the software cannot be imported into newer software and requires you to reprogram and test devices you will need to account for that in your scope.
Infrastructure gaps are both mechanical, electrical, and technical. If your new systems require an IP backbone and your previous system was standalone you will need to account for connecting it to your IP infrastructure.
Finally, Technology Gaps, these represent core gaps in technologies for example database technologies or operating system versions. These gaps will keep the new system from running unless they are addressed.
Step 4: Decide if the gap justifies an upgrade
Now that you have the cost of the upgrade fairly well detailed out you need to assess the cost of upgrading now, waiting, or ignoring the upgrade. In order to assess the cost you need to quantitatively define the impact of the device that needs to be upgraded. Will upgrading allow you to reduce energy? Will it increase mechanical efficiency?
This step is critical, many upgrades are avoided because a solid return-on-investment plan cannot be made. Do the following in order to make a simple return-on-investment calculation:
- Calculate the cost of the problem annually
- Calculate the cost of the upgrade (one-time) and the cost of maintaining the upgrade annually
- Calculate the new cost when the problem is fixed
Follow a simple ROI formula to determine the break-even year for cash-flow and then determine if this is a greater Internal Rate of Return then other integration options.
Step 5: Put a remediation plan in place
Regardless of whether you choose to pursue an upgrade or not you should choose to put a remediation plan in place. This could be a simple as bypassing a damper or as complex as rewiring multiple units. The key point is to put a method that can help mitigate the problem that is requiring an upgrade until the problem can be fixed.
I've seen many people leave dampers or valves stuck wide open while they debate whether or not to retrofit their systems.
Step 6: Create an upgrade process
Having a detailed process to create an upgrade is critical. The main reason I have seen upgrades fail is due to a lack of proper planning. There is a lot to creating an upgrade process but here are the big rocks you want to capture:
- Upgrade Plan Template (timing, stakeholders, systems)
- Detail out a communication plan (how and who will you communicate to)
- Impact (what is the expected impact)
- Rollback (how will you rollback issues)
- Validation (how do you validate success)
- Test Platform (do a bench test of the upgrade)
Step 7: Execute your upgrade
You've planned your plan, now you need to execute your plan. If you've put in the hard work up front this should be relatively painless. There isn't a ton to add to this step, simply execute your plan.
Step 8: Validate your upgrade
I've seen a lot of upgrades where people seem to just ninja vanish post upgrade. However, this is the most critical time for you to have your controls provider or in-house technicians involved.
Here is how I validate upgrades (you defined your upgrade use case right???)
- Have your different users through your use case. Can they accomplish the use case?
- Run the use case for a period of time, this is an art, not a science I recommend two weeks
- Perform a summer/winter check. Verify that your upgrade still works after a summer/winter changeover. I recommend building this into your standards for all projects
A Few Key TakeAways
So there you have it, I've just given you a series of key strategies to optimize your building automation system at your company. In each of these actions, I showed you why you should take the action, how you can take the action, and provide you a series of steps to work through the action.
I want you to take away the following points from this article:
- I highly recommend at a minimum that you create point standards, store your documentation in a central database, and utilize a remote connection solution. If you will do these three things you will be way ahead of the curve.
- Standardizing, as described in this article, will reduce the cost of your new projects, will reduce the hours needed to support your system, and will increase your ability to serve your occupants.
- These actions don't require perfection. Simply doing 3 or 4 of these actions or doing a few steps of each action will make you better than you were in past.
Next Steps
If after viewing this list you'd like to learn more tips and tricks, then you need to sign up for my free BAS training. It will take your building automation knowledge to the next level.